Unlost
Personal File Indexer
User Guide
What is Unlost?
Unlost is a personal file indexer that runs quietly in the background, reading the documents, spreadsheets, PDFs, and images in your chosen folders. It uses a small AI model — running entirely on your own computer, never the cloud — to understand what each file is about and tag it with rich metadata: document type, people mentioned, organisations, dates, amounts, and more.
When you need a file, you open the search window and describe what you remember about it. Unlost searches across the actual content of your files, not just their names, so you can find a contract you vaguely remember signing, a receipt from a specific shop, or a photo that contains a particular phrase in handwriting.
In addition to search, Unlost surfaces duplicate files that are wasting disk space, recently indexed files so you can quickly pick up where you left off, and expiry alerts for passports, contracts, and insurance documents that are coming up for renewal.
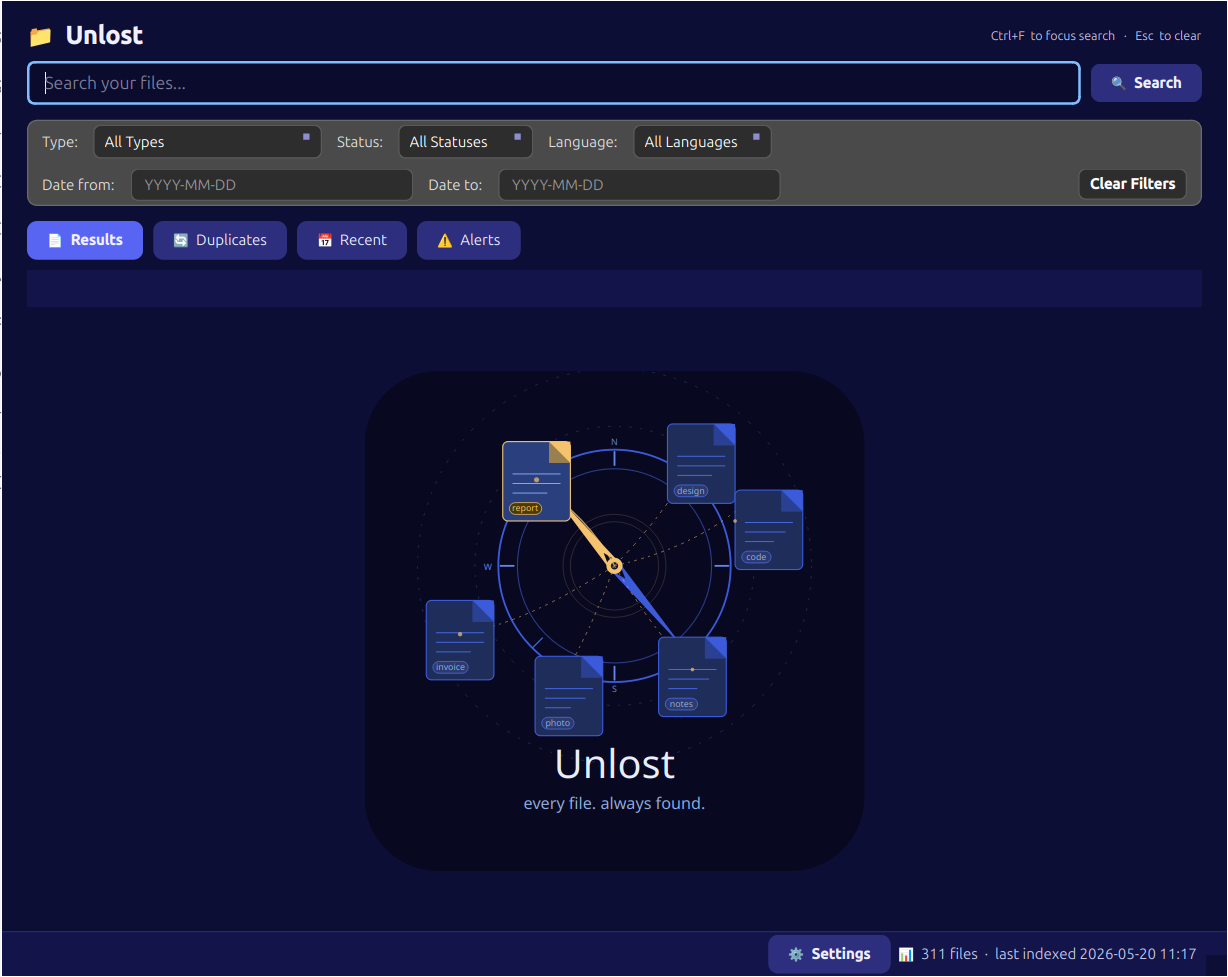
The Unlost search window.
Privacy & Security
Everything Unlost does — reading your files, running the AI model, storing what it learns — happens on your own machine. Nothing is uploaded anywhere. That local-first design comes with a few properties worth understanding.
Your index is a local, permission-locked file
The summaries, tags, people, organisations, and other metadata Unlost extracts are stored in a single SQLite database on your machine (see File Locations). Because this file can contain the same sensitive details as the documents it describes — names, amounts, expiry dates, and more — Unlost creates it, and its containing folder, with permissions restricted to your own user account.
Local maintenance commands are authenticated
The indexer listens on 127.0.0.1 for maintenance commands (used
internally by unlostcli for things like Cleanup and
Re-Index All). Each run generates its own private access token, so only
processes running as your user — not other local users or processes — can issue
those commands.
Downloaded models are integrity-checked
The AI models downloaded on first run are verified against a known checksum after downloading. If a download is incomplete or corrupted, Unlost deletes it and retries rather than loading a damaged model file.
System Requirements
| Component | Minimum | Notes |
|---|---|---|
| Operating System | Linux (64-bit) | Ubuntu 22.04 or later recommended. |
| RAM | 8 GB | 16 GB recommended for comfortable multitasking while indexing. |
| Disk Space | 10 GB free | ~600 MB for the application, ~8 GB for AI models (downloaded automatically on first run). |
| Internet | Required on first run | Models are downloaded from Hugging Face once. After that, the app works fully offline. |
| GPU | Not required | Any GPU with 3 GB+ VRAM — NVIDIA, AMD, or Intel (via Vulkan) — or Apple Silicon (Metal) will speed up indexing, but is entirely optional. Unlost detects your hardware automatically on first launch. See GPU Acceleration. |
| Ghostscript | Optional |
Not bundled with Unlost. Needed only to repair and index malformed PDFs —
most PDFs index fine without it.
Install with: sudo apt install ghostscript
|
./unlostcli --reindex-file /path/to/your/file.pdfInstallation
Unlost ships as a self-contained folder — no Python installation, no package manager, and no dependencies to install. Everything the app needs is bundled inside.
-
Download the release archive and extract it anywhere you like — your home folder,
/opt, or a USB drive all work fine.tar -xzf unlost-linux-x64.tar.gz cd unlost/ -
Mark the executables as runnable (only needed once).
chmod +x unlost unlostcli -
(Optional) Create a desktop shortcut. Right-click your desktop and choose Create Launcher, or copy the provided
unlost.desktopfile to~/.local/share/applications/.
unlost and unlostcli executables must stay in the same folder
as the bundled _internal/ directory. Do not move just the binary on its own.
First Run
Start the indexer by double-clicking the unlostcli executable (or running it
from a terminal). The first time it runs, several things happen automatically:
-
GPU detection. Unlost inspects your hardware and decides whether to use your GPU for AI model inference. It checks for Apple Silicon (Metal) and any NVIDIA, AMD, or Intel GPU (via Vulkan) with at least 3 GB of VRAM. The result — using GPU or using CPU — is printed to the terminal and saved to your config file. Detection only runs once; on subsequent starts the saved value is used directly. See GPU Acceleration for details.
-
Model download. Unlost downloads the AI models it needs (~8 GB total) from Hugging Face. A progress message appears in the terminal. This happens once; subsequent starts are instant.
-
Configuration created. A settings file is written to your config file. By default, Unlost watches your
~/Documentsand~/Downloadsfolders. -
Initial scan. Unlost works through every supported file in your watched folders. Depending on how many files you have, this may take several minutes to a few hours. Indexing happens entirely in the background — you can use your computer normally.
-
System tray icon appears. A small compass icon in the system tray shows that Unlost is running. You can now open the search window.
unlostcli process is the engine that indexes files and watches for
changes. The search window is a separate companion app that connects to it. If you
close unlostcli, search will still work on already-indexed files, but
new and changed files will not be picked up until you restart it.
The Search Window
Open the search window by launching the unlost executable, by clicking
Open Search in the system tray menu, or with the global hotkey
Ctrl+F9 (configurable in Settings).
The search bar and panel tabs across the top of the window.
Searching
Type any word or phrase into the search bar and press Enter (or click the Search button). Unlost searches the actual content of your files, not just their names.
You can search for:
- Words or phrases —
quarterly report - A person's name —
Sarah Ahmed - A company —
Acme Ltd - A document type —
invoiceorpassport - A date or year —
2023 - Any combination —
invoice Acme 2024
Wildcard searches
Use * as a wildcard to match any sequence of characters:
- List everything — type
*alone to show all indexed files. Combine with filters to narrow by type, date, or status. - Prefix match —
report*matches "report", "reports", "reporting", "report_2024.pdf", etc. - Suffix match —
*budgetmatches "Q1_budget", "annual_budget", etc. - Mid-word match —
re*ortmatches "report", "resort", etc. - Pattern in a phrase —
invoice*2024matches any file whose name, summary, tags, or keywords contain "invoice" followed by "2024".
Wildcard searches look across file name, summary, document type, tags, and keywords.
Filters
The filter bar below the search box lets you narrow results without changing your query. You can filter by document type (invoice, contract, report…), date range, or tag.

Filters narrow results after a search.
Opening a file
Click any result to open the File Detail dialog (see below). To open the file directly in its default application, click the Open File button inside that dialog.
Panels
Four panels are accessible via the tab row at the top of the window: Results, Duplicates, Recent, and Alerts. From any panel you can click a file to open the File Detail dialog.
Search Results
This is where search results appear. Each result shows the file name, its document type badge, a short AI-generated summary, and a relevance indicator. Results are ranked by how closely they match your query.

A typical set of search results. Document-type badges are colour-coded by category.
Recent Files
Shows the files that Unlost has indexed most recently — useful for quickly finding something you just saved or downloaded. The list refreshes each time you switch to this tab.
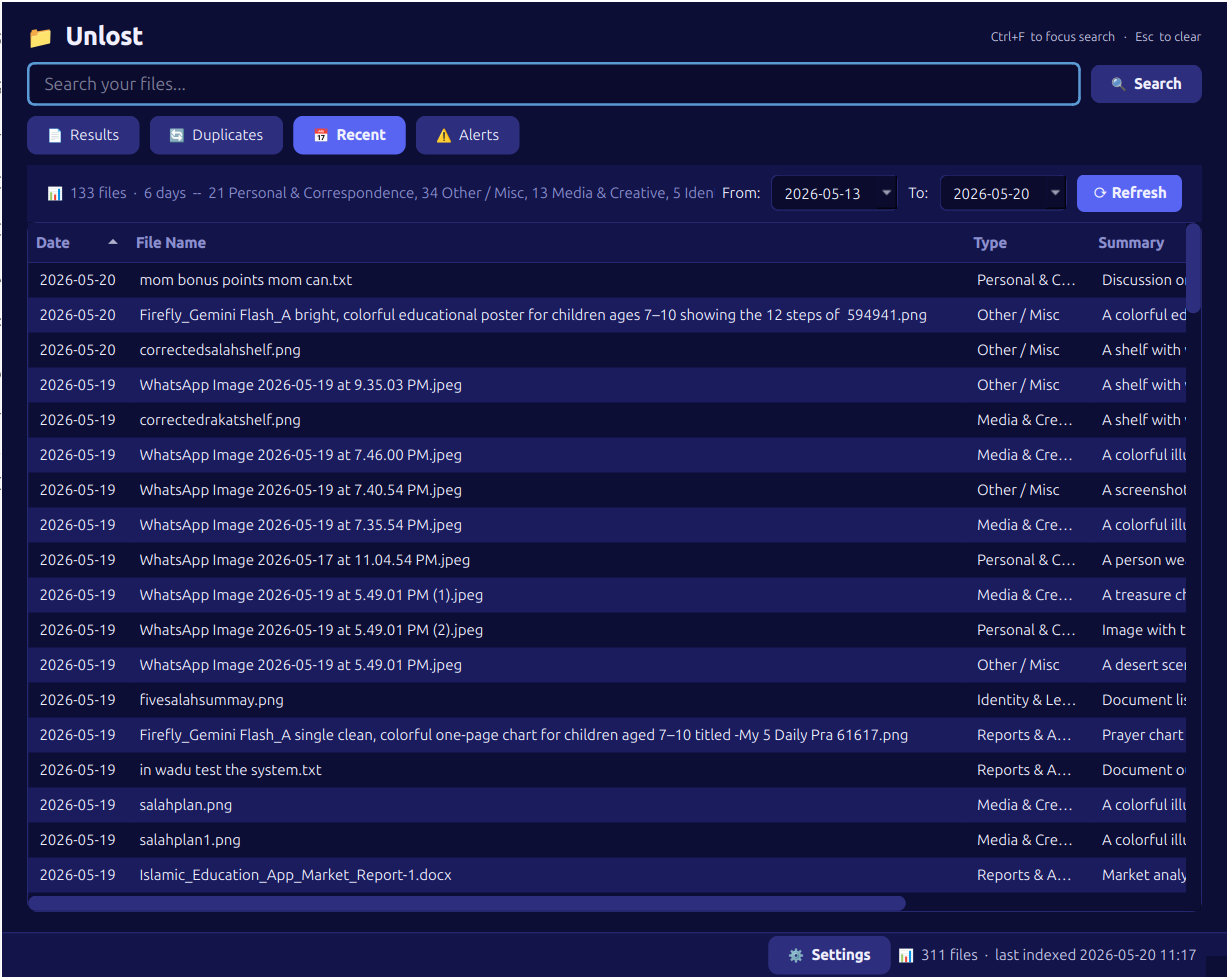
Recently indexed files, newest first.
Duplicate Files
Unlost detects files with identical content (regardless of name or location) by comparing their checksums. The Duplicates panel groups them so you can identify which copies to keep and which to delete.
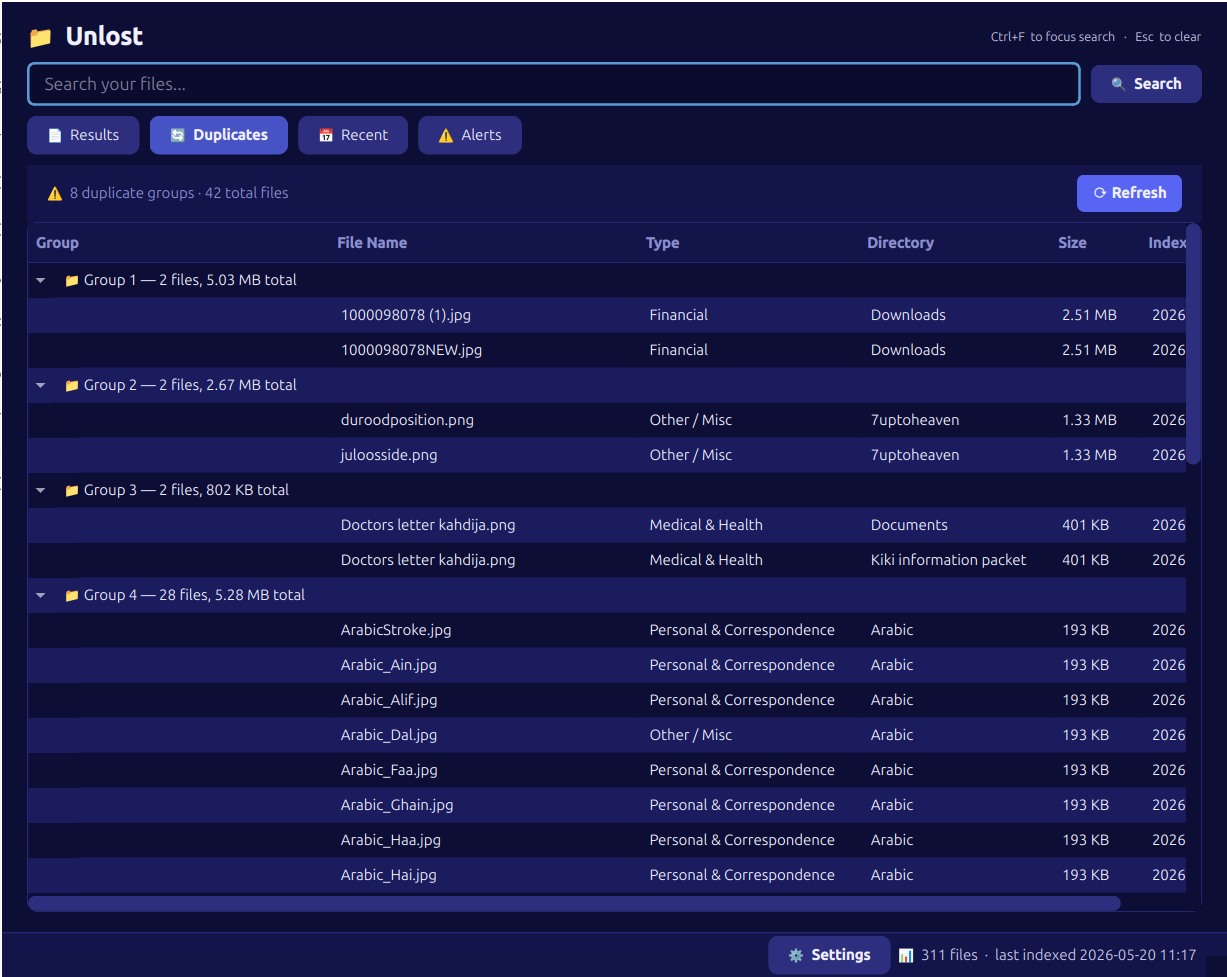
Duplicate groups. Each row shows file size and the date it was last modified.
Expiry Alerts
Unlost watches for documents that mention an expiry date — passports, visas, insurance policies, contracts, and certificates. Any document expiring within the next 180 days (configurable) appears here. You will also receive a desktop notification when Unlost first detects an approaching expiry.
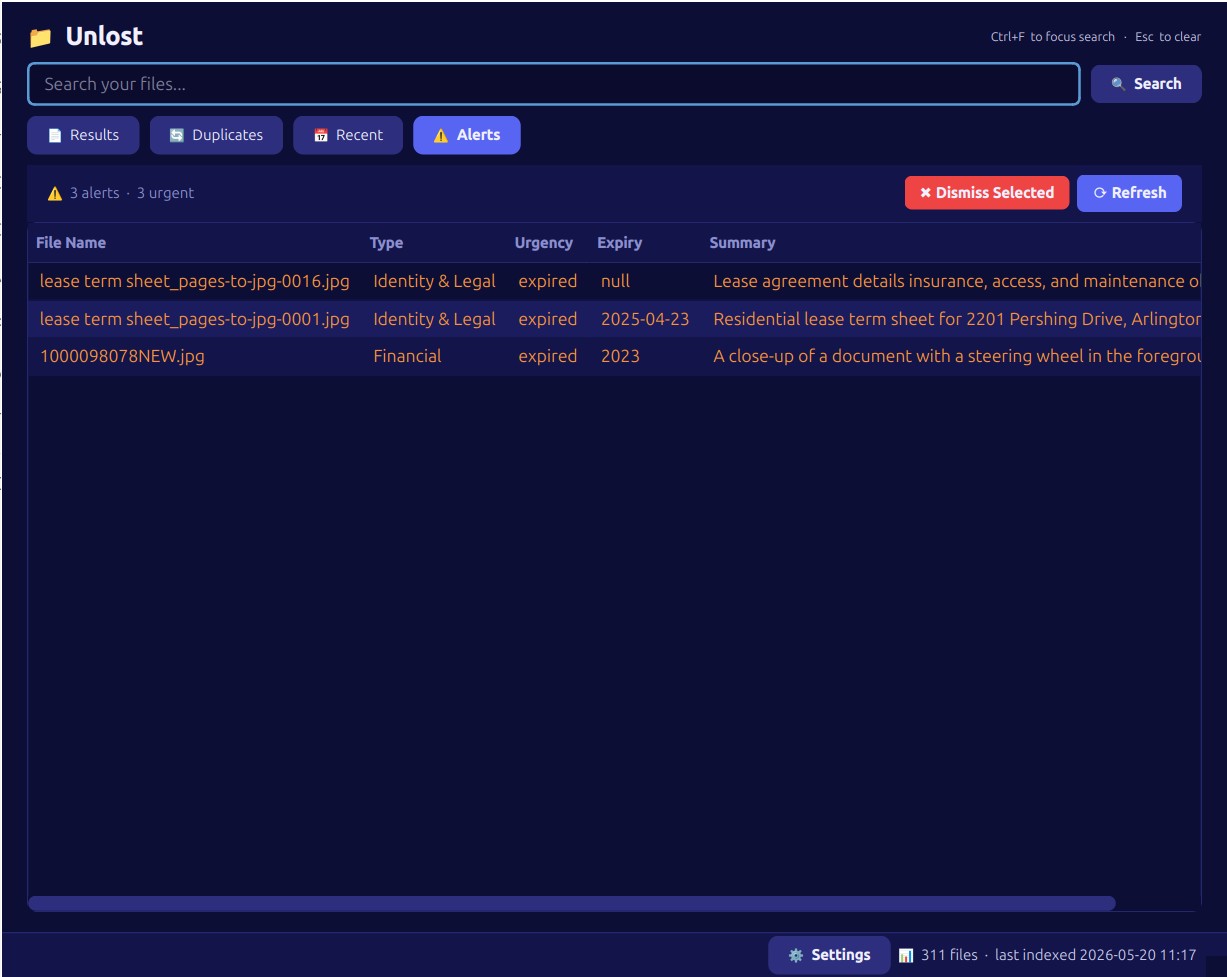
Expiry alerts, colour-coded from amber (approaching) to red (expired or imminent).
File Detail Dialog
Click any file in any panel to open the File Detail dialog. It shows everything Unlost knows about that file — its AI-generated summary, document type, tags, keywords, people and organisations mentioned, dates, monetary amounts, and more.
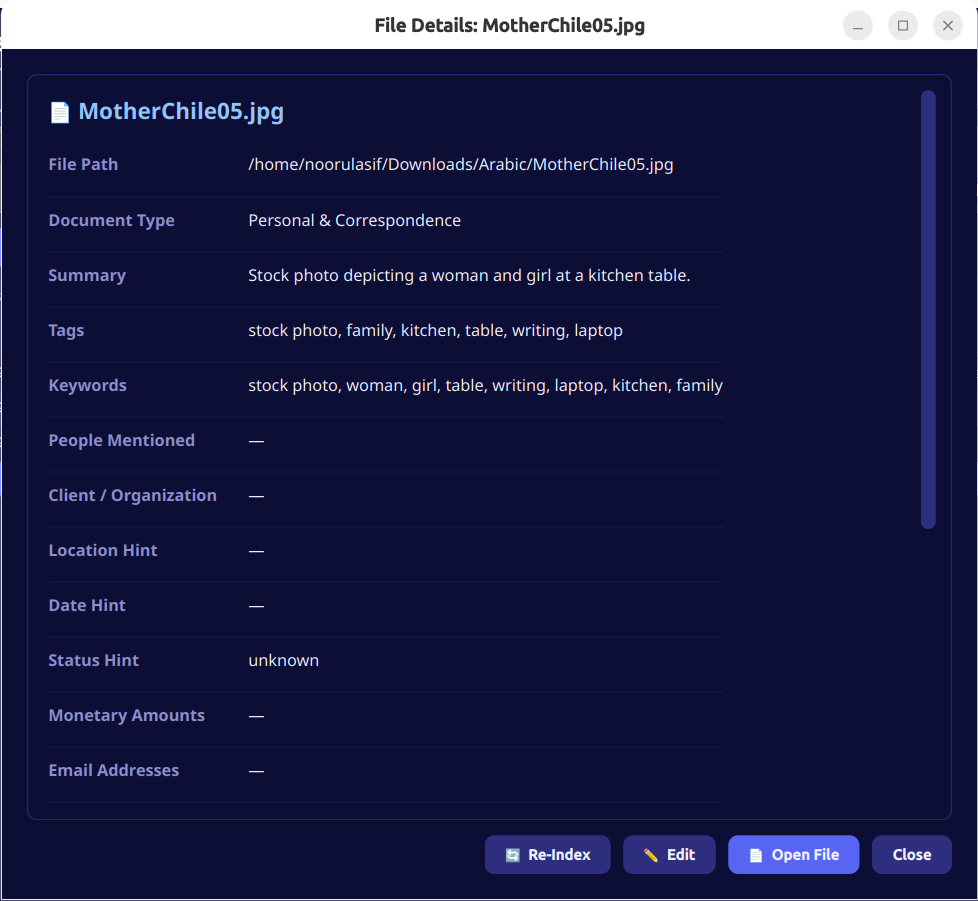
The File Detail dialog in view mode.
Actions
| Button | What it does |
|---|---|
| Open File | Opens the file in its default application (same as double-clicking it in your file manager). |
| Edit | Switches to edit mode so you can correct any metadata that the AI got wrong — document type, tags, summary, people, organisations, dates, and so on. |
| Save | Saves your manual edits back to the index. Your changes override the AI-generated values permanently. |
| Re-Index | Asks the indexer to re-read and re-analyse the file from scratch. Useful after you have edited the file's content and want the index to reflect those changes. |
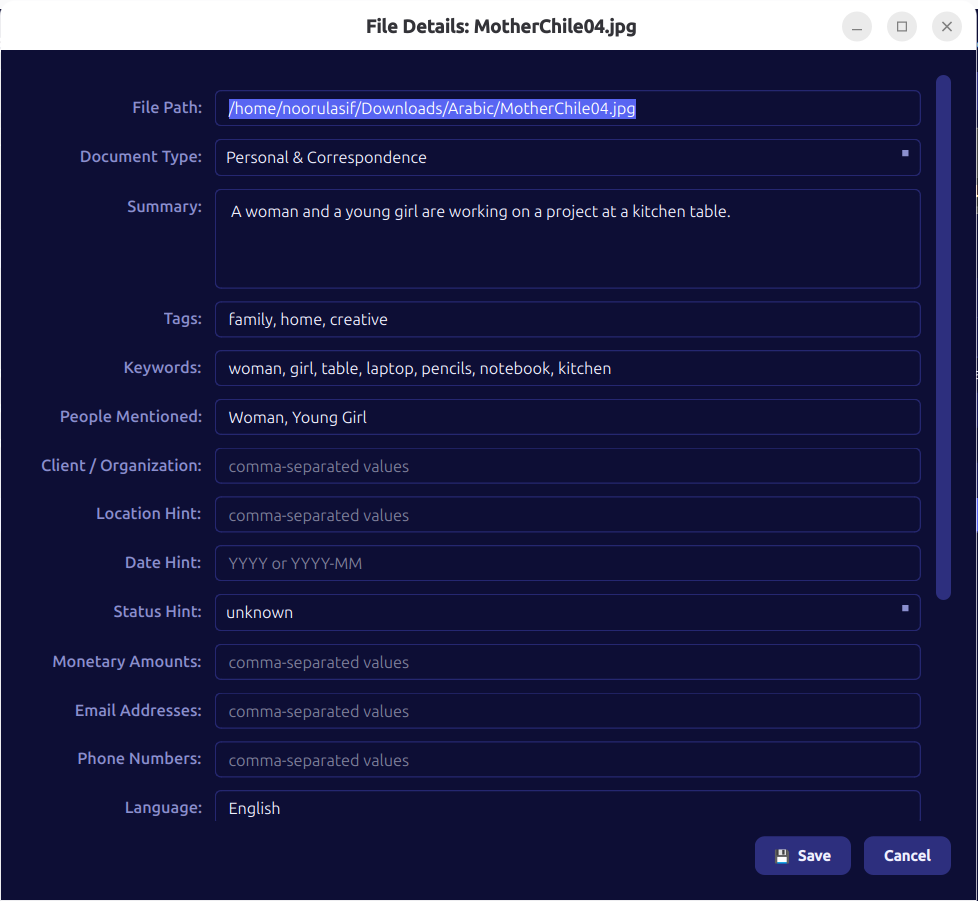
Edit mode — change any field and click Save to update the index.
Settings
Open Settings by clicking the ⚙ Settings button in the search window's status bar. Changes take effect the next time the indexer processes a file; you do not need to restart.
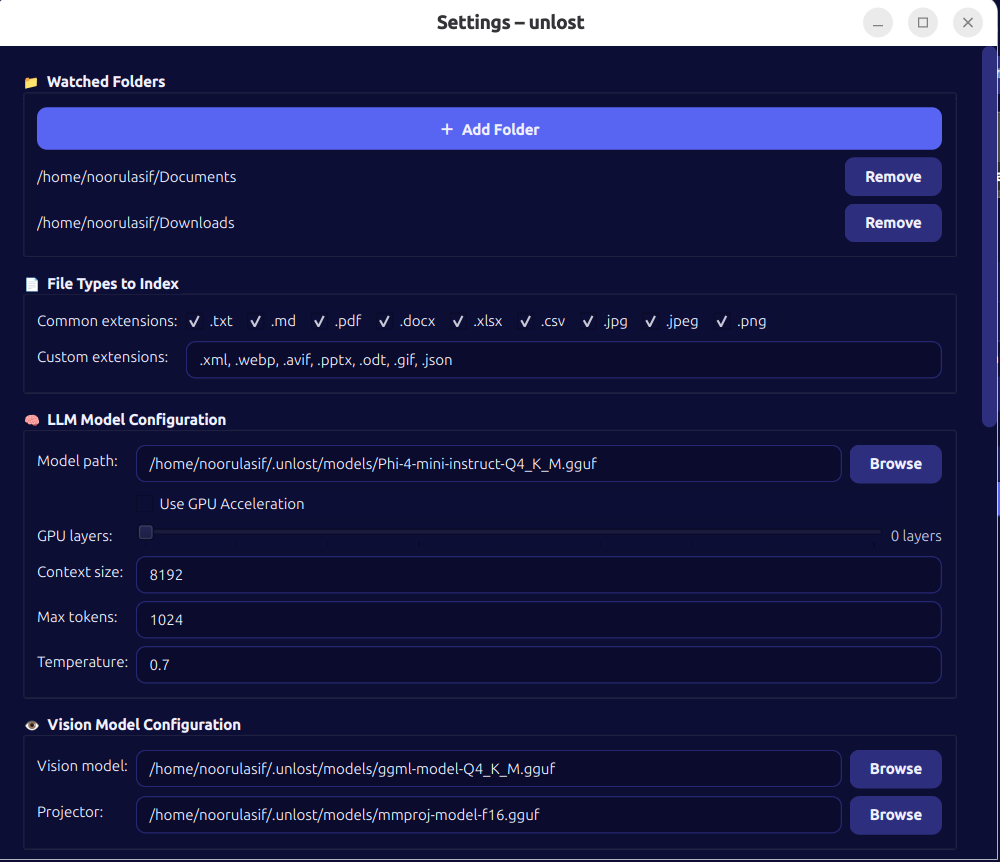
The Settings dialog.
Watched Folders
The list of folders that Unlost monitors for new and changed files. Click + Add Folder to add a directory. Only files directly inside a watched folder (and its sub-folders) are indexed.
File Types to Index
Toggle which file extensions Unlost should process. Common types (PDF, Word, Excel,
images…) are shown as checkboxes; you can also type additional extensions in the
custom field, comma-separated (e.g. .log, .rst). Below that, an
Ignore extensions field lets you explicitly exclude extensions
(e.g. .tmp, .lock), even if they would otherwise match.
Check Ignore hidden files to skip dotfiles and anything inside a
hidden folder (any path component starting with .) — enabled by default.
Expiry Alerts
Enable or disable expiry alerts and choose which document types to monitor (passport, contract, certificate, insurance, visa, or custom types you define). The Days ahead field controls how far in advance Unlost starts alerting you (default: 180 days).
Weekly Digest
When enabled, Unlost sends a desktop notification once a week summarising how many files were indexed, what document types were found, and any new tags added. Choose the day and hour for the digest.
Search Hotkey
The global keyboard shortcut that shows or hides the search window from anywhere on your desktop. Default is Ctrl+F9. Click the field and press a new combination to change it.
Show Ko-fi Support Badge
Toggles the small Ko-fi badge shown in the search window's status bar. Enabled by default. Unchecking it pops up a quick thank-you/reminder message, and the badge is hidden from the next time the app starts.
System Tray
While the indexer is running, a small compass icon appears in your system tray. Its appearance tells you what Unlost is doing at a glance.
| Icon state | Colour | Meaning |
|---|---|---|
| Idle | Grey | No files to process; the indexer is waiting for changes. |
| Indexing | Green + AI dot | Actively reading and analysing a file. |
| Paused | Amber + bars | Indexing is paused (you paused it from the tray menu). |
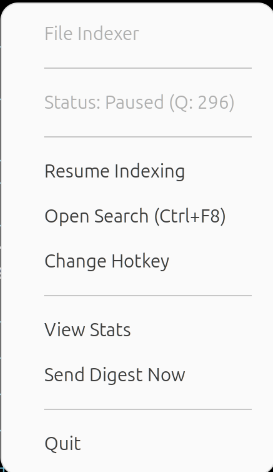
Right-clicking the tray icon shows these options.
Tray menu options
- Pause / Resume Indexing — temporarily stops processing new files without quitting.
- Open Search — shows the search window (also shows the current hotkey).
- Change Hotkey — lets you press a new key combination for the global search hotkey.
- View Stats — shows a quick summary of how many files are in the index.
- Send Digest Now — sends the weekly digest notification immediately, instead of waiting for its scheduled day and hour.
- Quit — stops the indexer.
./unlostcli --cleanup.
GPU Acceleration
Unlost can offload AI model inference to a GPU for faster tagging. Detection runs automatically on first launch (see First Run) and works across NVIDIA, AMD, and Intel GPUs via Vulkan, as well as Apple Silicon via Metal — not just NVIDIA/CUDA.
Minimum requirement: 3 GB VRAM
Unlost enables GPU mode only if it detects at least 3 GB of VRAM (dedicated graphics memory, or unified memory on Apple Silicon). Below this floor, offloading model layers to the GPU isn't worth the overhead, so Unlost stays on CPU and reports insufficient VRAM in the detection summary.
Automatic layer sizing (gpu_layers: 0)
The default gpu_layers value is 0, which means
auto rather than "no layers" — Unlost calculates how many
transformer layers will actually fit in your detected VRAM and offloads that many.
It does this by reading each model file's real layer count and size directly from
its GGUF metadata (both the text model and, if configured, the vision model — they
load into VRAM at the same time and share the same gpu_layers setting),
estimating an average per-layer memory cost, and fitting as many layers as your VRAM
budget allows — capped at the smaller of the two models' total layer count. If a
model's metadata can't be read yet (for example, detection running before the model
has finished downloading), Unlost falls back to a flat guess of 35 layers rather than
failing.
This calculation happens both at startup detection and again inside the tagger itself, so a GPU with less VRAM gets fewer offloaded layers (and a smaller speed boost) automatically, while a GPU with more VRAM gets more — you don't need to tune anything by hand.
Setting gpu_layers manually
If you set gpu_layers to any value other than 0 — either
by editing your config file directly, or by moving the GPU layers
slider in Settings — Unlost uses that exact number and skips
the automatic calculation entirely. This is useful if you want to deliberately
under-offload to leave VRAM free for other applications, or if you know your card can
handle more than the automatic estimate assumes.
gpu_layers
higher than your VRAM can actually hold, model loading may fail or fall back to slow
swapping. If unsure, leave it at 0 (auto).
Running CPU-only
To force CPU-only inference regardless of what hardware Unlost detects, set
"use_gpu": false in your config file, or uncheck
Use GPU Acceleration in Settings. A value of
false is always respected — detection is skipped entirely and
gpu_layers is ignored.
use_gpu.
Scheduled Indexing Hours
By default, Unlost indexes continuously, around the clock. If you'd rather restrict indexing to certain hours — for example, to avoid CPU contention with foreground work on a machine without a GPU — you can opt in to a scheduled window, such as 1am to 4am. Outside an active window, new and changed files still queue up; they're processed as soon as the next window opens, nothing is skipped.
How it works
Indexing hours are defined as up to two daily FROM–TO ranges (hours
0–23, on a 24-hour clock). At the top of every hour, Unlost checks whether the current
hour falls inside any configured range — from_hour is inclusive,
to_hour is exclusive, so a range of 1–4 is
active during 1am, 2am, and 3am, and turns off exactly at 4am.
When the window opens or closes, Unlost pauses or resumes the indexer using the exact same mechanism as the Pause / Resume Indexing option in the tray menu — so you can still pause or resume manually at any time; your manual choice simply holds until the next scheduled boundary.
--no-tray, it runs
continuously and ignores the schedule.
Configuring in Settings
Open Settings and find the Scheduled Indexing Hours group. Toggle Enable scheduled indexing to turn the feature on or off, and fill in Range 1 and, optionally, Range 2 with a From and To hour each.
- Up to two ranges are supported per day; the same schedule applies every day of the week.
- Leave a range's From and To equal (e.g.
0and0) to leave that range slot unused — this is how the default's unused second range is disabled. - From must not be later than To within a single range — overnight ranges that wrap past midnight (e.g. 10pm–4am) are not supported. Use a plain range within a single day instead, or split into two ranges if you need coverage on both sides of midnight.
"schedule_enabled": true in your config file.
Maintenance
Cleanup
If you move, rename, or delete files outside of Unlost, their old index entries become
stale. Cleanup (./unlostcli --cleanup) scans the database and
removes any entries whose files no longer exist on disk.
Re-Index All
Re-Index All — the button in Settings, or
./unlostcli --reindex — walks every watched folder and re-processes each
file. Files whose content hasn't changed since they were last indexed are skipped
quickly rather than re-analysed from scratch, and entries are only removed from the
index for files verified missing from disk — so a crash or interruption partway through
leaves already-indexed files intact instead of losing the whole index. This is useful
after updating Unlost to a new version, or if you believe some entries are stale or
incorrect. It will ask for confirmation before proceeding.
Force Re-Index All
./unlostcli --reindex-force walks every watched folder like
Re-Index All, but re-processes every file even if its content hasn't changed
since it was last indexed. Use this when the indexing logic itself has changed (for
example, after an Unlost update that improves tagging or extraction) and you want
existing entries regenerated, not just new/changed files picked up. Like a normal
reindex, it asks for confirmation before proceeding and can take as long as the initial
scan.
Re-Index a single file
Open the File Detail dialog for the file and click Re-Index. You can also run this from the terminal:
./unlostcli --reindex-file /path/to/your/file.pdfViewing index statistics
./unlostcli --statsThis prints a breakdown of how many files are indexed, grouped by document type.
Re-running GPU detection
Once GPU detection has run, the result is cached in your config file
under the use_gpu and gpu_layers keys. If you later add or
remove a GPU, or want to verify what hardware Unlost will use, run:
./unlostcli --redetect
This clears the cached detection result, re-probes your hardware, prints a summary,
updates config.json, and exits. The indexer does not start — you
then launch it normally.
"use_gpu": false (or true) manually in your config file.
A value of false is always respected
and detection is skipped entirely. A value of true is validated — if no
GPU is found at startup, Unlost resets it to false automatically. See
GPU Acceleration for the VRAM minimum and how
gpu_layers is calculated.
File Locations
Unlost stores its files in the standard location for your operating system. All
relative paths in config.json (such as file_index.db or
models/) are resolved against the data directory.
| Platform | Config file | Data directory |
|---|---|---|
| Linux | ~/.config/unlost/config.json |
~/.local/share/unlost/ |
| macOS | ~/Library/Application Support/unlost/config.json |
~/Library/Application Support/unlost/ |
| Windows | %APPDATA%\unlost\config.json |
%APPDATA%\unlost\ |
XDG_CONFIG_HOME and XDG_DATA_HOME environment variables
are respected if set.
Configuration Reference
Unlost stores its configuration in your config file (see File Locations). You can edit it directly in any text editor, or use the Settings dialog. If the file does not exist, Unlost creates it with sensible defaults on first run.
unlostcli process for all
changes to take effect.
| Key | Type | Default | Description |
|---|---|---|---|
| watched_folders | list of paths | ["~/Documents", "~/Downloads"] |
Directories that Unlost monitors for new and changed files. |
| file_extensions | list of strings | [".pdf", ".docx", …] |
File extensions to index. Extensions not in this list are ignored. |
| ignore_extensions | list of strings | [] |
Extensions to explicitly skip, even if they appear in file_extensions. |
| ignore_hidden | boolean | true |
Skip dotfiles and anything inside a hidden folder (any path component starting with .). |
| max_file_size_mb | number | 50 |
Files larger than this (in megabytes) are skipped. |
| model_path | path | auto | Path to the text AI model (GGUF format). Set automatically on first run. |
| vision_model_path | path | auto | Path to the vision AI model used for analysing images. |
| use_gpu | boolean | auto-detected |
Whether to run AI inference on the GPU. Written automatically on first launch —
true if a supported GPU is found (any NVIDIA, AMD, or Intel GPU via
Vulkan, or Apple Silicon via Metal, with ≥ 3 GB VRAM), false
otherwise. You can override this manually; setting it to false
permanently disables GPU use. To force re-detection, run
./unlostcli --redetect. See GPU
Acceleration.
|
| gpu_layers | number | 0 (auto) |
Number of model layers to offload to the GPU. 0 means
auto when use_gpu is true — Unlost
calculates a layer count that fits your detected VRAM (falling back to
35 if a model's size can't be read yet). Set any nonzero value to
use that exact layer count instead and skip the automatic calculation. See
GPU Acceleration.
|
| idle_unload_minutes | number | 5 |
Minutes the indexing queue must sit empty before Unlost unloads the text and
vision models to free RAM/VRAM for other programs. The models are reloaded
automatically — with a brief one-time delay — the next time a file needs
tagging. Set to 0 to keep the models loaded permanently.
|
| alerts_enabled | boolean | true |
Enable or disable expiry alerts entirely. |
| alert_types | list of strings | ["passport", "contract", "certificate", "insurance", "visa"] |
Document types to watch for expiry. Add custom types as plain strings. |
| alert_days_ahead | number | 180 |
How many days before expiry Unlost starts alerting you. |
| digest_enabled | boolean | true |
Enable the weekly indexing summary notification. |
| digest_day | string | "Monday" |
Day of the week to send the digest. Full English name (e.g. "Friday"). |
| digest_hour | number | 9 |
Hour of the day (24-hour clock) to send the digest. |
| schedule_enabled | boolean | false |
Enable or disable scheduled indexing hours. Off by default, so indexing runs continuously; turn it on to restrict indexing to specific hours. |
| indexing_schedules | list of objects | [{"from_hour": 1, "to_hour": 4}, {"from_hour": 0, "to_hour": 0}] |
Up to two daily {"from_hour": N, "to_hour": N} ranges (0–23) during
which indexing is active. from_hour is inclusive, to_hour
is exclusive; from_hour must not be greater than to_hour
(no overnight wraparound). A range with equal from_hour/to_hour
is treated as unused. See Scheduled Indexing Hours.
|
| search_hotkey | string | "ctrl+f9" |
Global keyboard shortcut to show or hide the search window. Use standard modifier names: ctrl, alt, shift. |
| start_search_hidden | boolean | true |
If true, the search window starts hidden and is shown only via the hotkey or tray menu. |
| database_path | path | "file_index.db" (in data directory) |
Location of the SQLite database that stores the file index. Moving this file will clear the index. |
| show_kofi_link | boolean | true |
Show the Ko-fi support badge in the search window's status bar. |